SEARCH
social media
friends & sponsors
  • Contact Me

    This form will allow you to send a secure email to the owner of this page. Your email address is not logged by this system, but will be attached to the message that is forwarded from this page.
  • Your Name *
  • Your Email *
  • Subject *
  • Message *

Entries in makey (32)

Sunday
Aug112013

a homemade card game for preschoolers

It's nearly impossible for me to believe that one of George's best friends just turned four, but turned four he has, and soon another bestie does, and then my very own eldest child will be firmly in preschooler territory.

When I asked George what birthday gift we should give his friend, he came up with a wonderful idea for a homemade game inspired by the (apparently out of production) family favorite Too Many Teddies. It was entirely manageable, something that he came up with on his own that I could refine slightly for logistical reasons, and easily/cheaply made: the perfect birthday project for us. While I usually try to involve the kids in the making or buying of presents for their friends and family, this was the first time that George was able to meaningfully participate, and his pride in the finished product was evident and adorable. 

This idea is easy to replicate with any object your kids like -- animals, shapes, cars like George chose -- as long as it can be drawn easily in four different colors. 
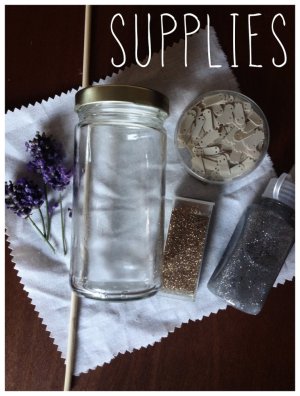
Materials:

Markers, about 41 pieces of cardstock (plus a couple of pieces of plain white paper), a printer or access to a copy center, a box (a bag or other container would work as well), access to a laminator if you want your cards to be laminated (we did, for durability and the baby brother factor). Total cost: around $22

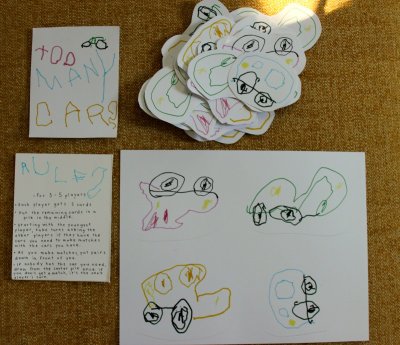
First, George chose the colors he wanted to use for the cars: orange, blue, red and green. He drew them, we cut them out and pasted them four-up on a sheet of paper for easier copying. If you have ink in your home printer, this will be even cheaper than $22, and you won't have to bother with the cutting/pasting step if you can simply scan and print. George wrote the word Rules and we decided on the rules together; it's basically Go Fish, with cars and the allowance for anyone to offer up a car to a fellow player in need of a particular color. 

We took the copy-ready stuff to Office Max and made ten copies of the cars onto cardstock (for 40 total cars -- 10 of each color). If you're doing this for a kid with no mouthy babies in the house, cardstock alone (as opposed to lamination, as we did) is probably just fine, and certainly less expensive. We decided to cut around the cars, but rectangular cards might be better for older children who are hip to things like the subtle differences in shapes. We designed our game to be cooperative, so that doesn't matter. George made a cover for the game, and we copied that as well as the rules onto cardstock, too. 

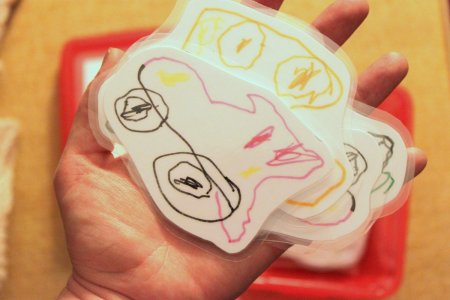
After copying and cutting, we returned to Office Max and had the cars, rules and cover laminated. They let us load the pouches ourselves so we were able to maximize the space, and we used 8 sheets (at $1.10 per). 

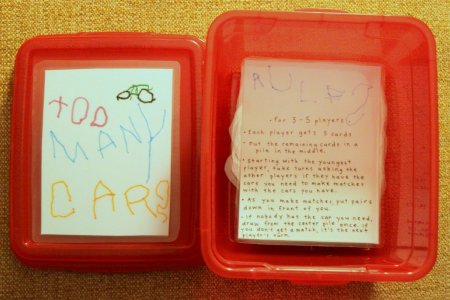
We found a bright, nice sized plastic box at the dollar store and attached the cover with superglue. The lamination means the cover will pop off if they ever want to re-use the container but it's durable and big enough for little hands to easily open and close. Altogether, $22 is not too shabby for a one of a kind, homemade gift that will last! I can't wait to see George and his best dude play it, and I hope said dude finds lots of different ways to enjoy his gift. What have you and your preschooler made together lately?

Thursday
Jul182013

DIY aromatherapy calm down jar


Three and a half has brought with it some interesting changes in George's moods, behavior and communication. He's more in tune with his feelings than ever before, and when he has messed up (being hurtful to his sister, primarily, but also when he's being stubbornly unhelpful or otherwise rascally), he is more inclined to approach us with an apology and try to make amends without prompting. We still sometimes need to remove him from difficult situations for others' safety, or to respect their space, but his ability to shorten the distance between that and a willingness to fix it and move forward is heartening. To provide George with a new coping skill that might defuse the tension (or, metaphorically, diffuse it, if we wanna get homonymous), I decided to make him a calm down jar with an added aromatherapeutic factor. 

You'll need an old jar, some fine(ish) glitter, glitter glue (mine is from the dollar store), a stirrer you don't care about (I used a bamboo skewer), a scrap piece of muslin or other cotton fabric roughly three times the size of your jar's lid, a bit of lavender, some confetti (optional; you could also use sequins, small buttons, whatever -- the heavier it is, the faster it sinks), and hot water. 

Put a kettle on, or a cup of water in the microwave. You'll need hot water in the next step. Pour some of the glitter (NOT the glitter glue) into your jar (mine is a recycled jam jar with a tight-fitting lid). 1/4 inch in the bottom of the jar should be plenty. Add some confetti if you want; I had these weird ghosties leftover from something, but the glitter alone works just fine, too. 

Fill your jar half full with hot, hot (not boiling) water. Squirt in some glitter glue, stirring constantly lest it clump up. I used about a third of a 3 oz bottle, and could've probably used less, but it's not an exact science. When you're satisfied that the glitter glue is totally incorporated, fill your jar up with hot water, leaving about half an inch of headroom at the top. Let it cool a little before you seal it, because you'll be doing some handling, and... it's hot. 

Lay your lid on your fabric and mark a circle that's at least an inch larger on each side, the cut it out with pinking shears so it doesn't fray. Place some lavender in the center of the fabric. Close your jar as tight as you possibly can, and glue it if your kid might try to loosen it, because this spill would undoubtedly be the worst mess of all time. Carefully place the fabric, lavender side down, on the lid, and push any stray lavender back on top of the lid. Secure it tightly with a ribbon.

Shake it up, give the top a scratch, inhale the calming scent of lavender and watch the glitter settle as your nerves do, too. Encourage your child to keep the jar in an accessible place and use it whenever they want. 

Sunday
Jan132013

an early birthday

I am no good at giving presents. Well, I'd like to think that I'm good at some aspects of gift-giving. I put thought into it, and often a lot of time. But when it comes to waiting or surprising I'm pretty much the worst. It usually works out, since as a procrastinator I don't frequently have long to wait between finalization of gift and handing it over, but every once in awhile I plan ahead and find myself with weeks of lag time. This simply will not do, and do it did not in the case of Zelda and the armless baby.

Zelda's beloved Gob, a naked thriftstore baby George picked out a long time ago and had since abandoned -- her akimbo limbs and creepy, uneven, dead-eyed blink citable as potential turn-offs -- recently lost an arm. It's no shame for her; she's dragged around by her arms more than anyone can be expected to survive, limbs intact. This hasn't affected Zelda's love much, but it was a good opportunity for me to make her a new doll. With her birthday coming up, I had the occasion in addition to the reasoning. 

Waldorf doll making has always intimidated me. The particular supplies, the expense and the precise techniques were hurdles I hadn't overcome though I've long admired the style. Meg McElwee's book Growing Up Sew Liberated: Making Handmade Clothes and Projects for Your Creative Child includes a pattern for a Waldorf doll, and it's been in the back of my mind since George was smaller. Alas, he's never really taken to dolls. Zelda is a different story, though, my children being so unbelievably gender stereotypical as to make me think someone is playing a joke.

 I love Meg's book (and blog) and the directions seemed clear enough to allow for some finagling according to my budget and crafting style which is a little more by-the-seat-of-my-pants than Waldorf dolls generally call for.

I regret that the face isn't shaped, and if I ever make another I'll put more time into the facial features. The body is out of some soft bamboo velour I thought was perfect for a one year-old to snuggle, and the clothes are made from fabric scraps (Heather Ross' beautiful and now out of print mermaids) and leftover yarn. Choosing the hair yarn was tough, and I wish that I'd found something more colorful to make a real rainbow mop but that, too, is something for the next attempt.

This doll is most definitely a quick and dirty version of a Waldorf doll, but the Sew Liberated pattern and instructions gave me a great starting point and I gained some knowledge about how to attach arms and heads in ways that don't result in droopy shoulders and floppy necks. Because it's tough to have a tea party with someone who can't stay awake.

She's real cute, and, true to form, I couldn't wait until Zelda's birthday to see the reaction, even though every gift I've ever handmade for my kids has been met with the same vague interest. When will I learn? Never! It doesn't really matter -- most of the fun is in the making, anyway. 

At their introduction, Zelda dubbed her "Dunna!" which we took to mean Donna, a perfectly suitable sister for an armless baby named Gob. 

They were fast friends, though Donna's gonna have to do something to prove her unconditional devotion á la allowing herself to be drawn and quartered. 

The entire project took me three evenings of off and on work, the most time-consuming being the altogether pleasant handwork of the face, hair, and foot shaping.


I think Zelda's actual birthday may see the opening of a matching outfit or two, because I am that person I would never have expected myself to turn into, who loves matching outfits on pretty much anyone and anything. When I was little, my mom made me a life size Raggedy Ann with a dress and pinafore for each of us, and if photos are to be believed it was a monumental hit.

I think a more androgynous doll may be next on the agenda. Overalls, shorter hair, and some actual facial features.

Happy early birthday to you, Goldie. Here's to a (doll's)life-long friendship.


Wednesday
Dec122012

DIY photobooth-style family photos

The other morning on the radio, I heard a piece about hipsters: what defines a hipster, what sorts of things they like. It was kind of inadvertently funny, but had an interesting takeaway. Hipster culture is, one interviewee posited, a byproduct of a generation unable to display sincere emotion. Nothing can be enjoyed for its own sake, but must be enjoyed "ironically," presumably, I guess, because that lends the participants plausible deniability. 

I'm definitely guilty of this sort of tendency to downplay my enjoyment through irony. Case in point: Though I've been decorating our house for the holidays since we moved, I've only this week stopped apologizing for the dorkiness and admitted that I just like holiday decorations. 

Anyhoo, long story (not very) short, I hesitated to make the photobooth canvas Hanukkah project I'd chosen because I thought it might be too goofy, not arty or offbeat enough for our walls. Yes! That was stupid. Even after it was done, I asked Nathan if it wasn't too silly to hang up. I've only recently warmed to the concept of having family photos around the house (photos of family members who live in the home, that is), so this one was a stretch for me. I'm glad I went for it, because it's so cute. So, so cute. And here is how I did it (sorry for the funky formatting. All the info is there and I don't care enough to mess with it):


To make the pictures look like they were taken in a photo booth, we positioned ourselves in front of the living room curtains, then, in Picasa, made them black and white and used the vignette tool. 

I gathered my materials: 

- an 8x24" stretched canvas (not pictured)
- mod podge (matte)
- foam brush
- scissors
- 4 5x7 family photos, B/W copied

I cut the pictures out, and left a small border but wish I hadn't. 

I then laid out the pictures where I wanted them, switching up the order until they looked right. In my case, Nathan and I have the darkest/most hair, so putting our pictures next to each other looked bad.


For the mod podge initiated this will be obvious, but for those who don't frequently decoupage it may feel like you're screwing up your pictures. You are not! Brush a thick coat of mod podge onto the back of each picture, making sure to get the corners and edges. Stick them in place one by one and smooth out the bubbles, working from the middle to the outer edges. 

Your paper will bubble up a little no matter how diligently you smooth, but don't worry. It'll dry flat.

After you've placed your pictures where you want them and smoothed them all out, you can sit back and get a preview of how it's going to look when finished. 

Adorable?

Great!

Next!


Cover the whole surface with a thick coat of mod podge, being careful not to loosen any of your edges. I try to go in the same direction though I'm not sure it matters.

Let the first coat dry (15-20 minutes) and do another coat. I did three coats and was really concerned about some major bubbling that was making George look like he'd been punched in the eye.

I decided to leave it overnight to see if the bubbles went away, and they did! There are a few small creases and wrinkles, but I think that adds to the charm. 

I hope yours turns out just as cute as ours! 


Monday
Oct012012

a lesson in melted wax 

Inspired yet again by The Artful Parent, I decided to try to help George a little with his fine motor skills by way of sprinkling, a practice he frequently enjoys, mostly by sprinkling the rice out of his sensory bin onto the dining room floor. I so love all of TAP's "stained glass" activities and felt like our big dining room windows could use a little cheer, since the daylight is getting shorter and considerably less bright. More grey. Pretty, and a welcome change, to be honest, but cheer never hurts. 

We had some old Stockmar beeswax crayons that didn't mind sacrificing themselves for a good cause. If Nathan cared that I (possibly) ruined the parmesan-specific cheese grater, he hasn't said so. 

I had to stop myself from saying spread them out, now, George. Don't lump them all in a pile. Distribute them evenly, for godssakes, or all you'll get is a brown wax lake.

I wanted to say those things. I certainly thought them. I demonstrated my own sprinkling on my own small sheet of wax paper with perhaps a little too much zeal. I couldn't help myself; I'm bossy. I'm a perfectionist. The poor child comes by it honestly when he says with a frown, "But I'm not good at it!" Because I tell him it doesn't matter, that trying is the thing. That everyone is bad at all of it, to start. But I hate it, too, being not good. Alas. There his wax was, in piles. He took a nap and, with the baby in the Ergo, I placed his and mine next to one another between sheets of butcher paper and ironed. 

Mine is on the bottom, his on the top. My confetti, his painter's dropcloth. 

Mine boring, measured, neat. His messy, unpredictable, with bubbles and swirls and colors I didn't grate. Colors, actually, that I said to myself as I grated, I wished we had. An olive green would be nice. A sienna or a plum. Something to more accurately reflect the season. Beautiful.

By contrast, the carefully sprinkled colors on my mine became muted and dull, desaturated as they bled into the milky wax of the paper. I traced and cut triangles and sewed them together to make buntings. I kept the pieces of mine small, but cut George's generously to make a big, bold decoration for our Fall windows. A reminder to me: back off and let the kid do his thing. 

Pardon all the pictures (and the dirty windows), but it was a sight to behold.